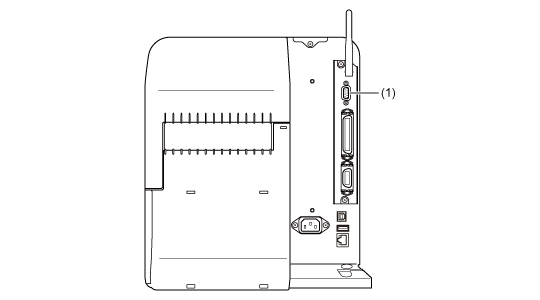
Connect the interface cable when the product is powered off.
Connect the RS-232C cable to the RS-232C connector (1).
Configure the interface settings of the product according to the interface settings of the computer.
The communication conditions of the RS-232C interface can be set through the product's
[Interface]menu or the All-In-One Tool.
|
|
|
•
|
To use the RS-232C interface to connect with the computer, the product's [Tools]> [Barcode Checker]> [Test]> [Interface]menu must be set to [RS-232C].
|
|
•
|
The interface settings of the computer can be confirmed by the following. In the Device Manager, right-click [Ports (COM & LPT)]> [Communications Port (COM1)]and select [Properties]. Then, check the [Port Settings]tab of the displayed Properties screen.
|
|
•
|
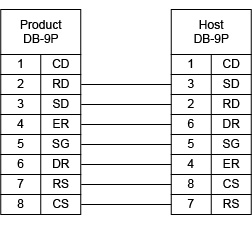
For the RS-232C cable, note that the connection cable varies according to the communication protocol setting. If you use the wrong cable, it will not operate correctly.
|
|
•
|
If the communication settings differ between the computer and product, it will not operate correctly. A communication error will be detected.
|
|
•
|
To use the printer driver, the communication protocol must be set to Status4. (The initial value for the communication protocol for the product's RS-232C interface is Status4.)
|
|
•
|
Be sure to use the recommended RS-232C cable.
|
|
•
|
Printing using the USB serial conversion cable is not guaranteed. Also, no support for the connection procedure is provided.
|
|