Problem/Answer
You can create and apply a Printer Configuration File using the app.
This functionality allows users to create and save a new configuration file to configure the printer via Wi-Fi, Bluetooth, or NFC interface. It allows users to easily change the printer configuration from the default setting as shown on the
[Create Configuration File] screen and apply the saved file to the selected printer.
The procedure for Creating Printer Configuration File is as follows.
|
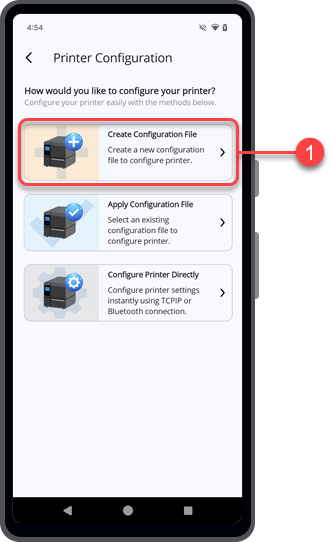
1.
|
On the [Printer Configuration] screen, tap [Create Configuration File].
|
The
[Select Printer Model] screen appears.
|
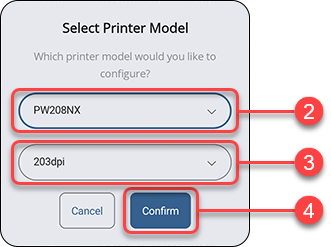
2.
|
Select the desired printer series from the drop-down lists.
|
You may do a quick search by entering the initial of the printer model, the most probable printers will show in the drop-down list.
|
3.
|
Select the resolution and printing mode (if available) from the drop-down lists.
|
These selections are only available for some printers.
|
4.
|
Tap the [Confirm] button.
|
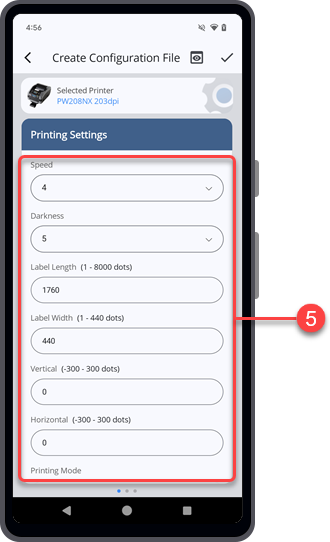
The
[Create Configuration File] screen appears and shows the printer configuration with the default settings of the selected printer model.
|
|
The menus and settings available on the [Create Configuration File] screen depend on the printer model.
|
•
|
Most models include [Printing Settings], [Interface Settings], and [Applications Settings].
|
|
•
|
WT4-AXB series (International Model) printers include only [Printing Settings] and [Interface Settings].
|
|
|
5.
|
On the [Printing Settings] menu, tap the desired setting items to make any changes.
|
Swipe the screen upward to view more setting items in the menu.
|
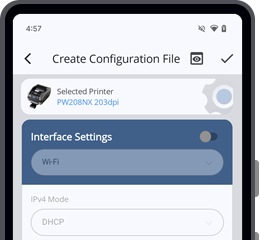
6.
|
Swipe the screen from right to left to switch to the [Interface Settings] menu.
|
The
[Interface Settings] menu is initially set to disable mode. The setting items are not available.
When the
[Interface Settings] menu is disabled, the configuration of the
[Interface Settings] menu will not be included in the configuration file.
|
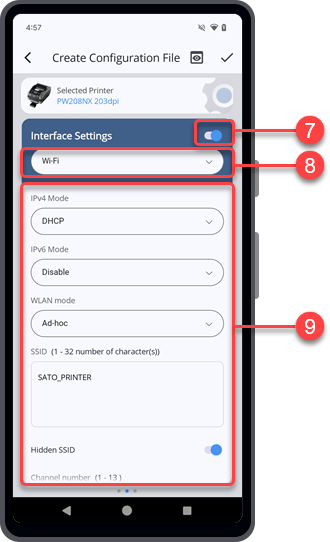
7.
|
If you want to include and configure the [Interface Settings] menu, tap the toggle switch to set to enable. Otherwise, skip this step and proceed to step 10.
|
|
8.
|
Tap to select the type of interface that you want to configure.
|
The available interface options differ from the printer series selected.
|
9.
|
Tap the desired setting items to make any changes.
|
After you have finished configuring the
[Interface Settings] menu, proceed to the next step.
|
10.
|
Swipe the screen from right to left to switch to the [Applications Settings] menu.
|
Similar to the
[Interface Settings] menu, the
[Applications Settings] menu is initially set to disable mode.
|
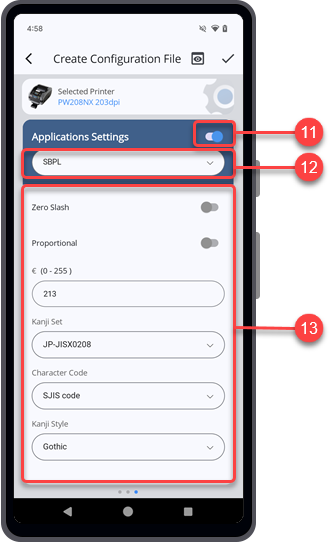
11.
|
If you want to include and configure the [Applications Settings] menu, tap the toggle switch to set to enable. Otherwise, skip this step and proceed to step 14.
|
|
12.
|
Tap to select the type of application that you want to configure.
|
The available application options differ from the printer series selected.
|
13.
|
Tap the desired setting items to make any changes.
|
After you have finished configuring the
[Applications Settings] menu, proceed to the next step.
|
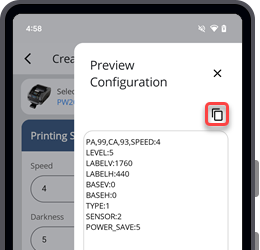
14.
|
Tap  on the upper right corner of the [Create Configuration File] screen to preview the content of the printer configuration file. on the upper right corner of the [Create Configuration File] screen to preview the content of the printer configuration file.
|
The
[Preview Configuration] dialog is displayed.
Tap

to copy the content to the clipboard.
Tap

to close the
[Preview Configuration] dialog.
|
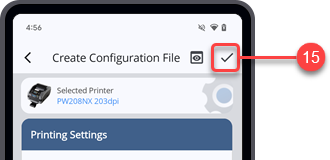
15.
|
When you have finished configuring the printer settings, tap  to proceed saving the configuration file. to proceed saving the configuration file.
|
|
16.
|
When the [File Encryption] dialog is shown, select [Yes] if you want your file save with a password or select [No] if you want to save the file without password encryption.
|
For iPhone users, please proceed to step 20. File Encryption function is only available for Android device.
|
|
|
•
|
As there is no option to reset or retrieve a lost password, users are responsible for keeping their passwords safe.
|
|
If you selected
[Yes], proceed to the next step.
If you selected
[No], proceed to step 20.
|
17.
|
Enter four characters PIN code that contains only alphanumeric characters and symbols on the field boxes.
|
Your password can include upper and lower case letters, numbers, and special characters like !,@,#,$,%,^,&,*,-,+,=, or /, but it should not include any spaces.
Tap the

icon located next to the PIN code field to show the password you have typed in.
|
18.
|
Re-enter the same pin code in the confirmation field to confirm it.
|
|
19.
|
Tap the [Confirm] button.
|
|
20.
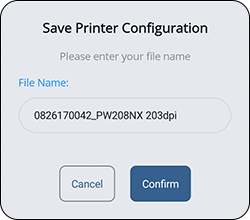
|
When the [Save Printer Configuration] dialog is shown, enter your preferred file name and tap [Confirm].
|
|
|
|
•
|
By default, the printer configuration file is saved in the Internal storage/Download folder of the Android device, or in the application (All-In-One Tool) folder of the iPhone.
|
|
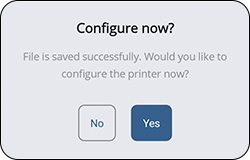
After the file has been successfully saved, the
[Configure now?] dialog is shown.
|
21.
|
Tap [Yes] if you want to continue to configure the printer with the saved configuration file. Tap [No] to return to the [Create Configuration File] screen.
|
If you select
[Yes], the
[Configure Printer] screen is shown.
|
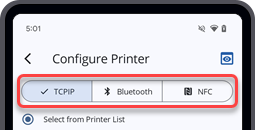
22.
|
Select the interface and the ways that you want to connect and apply the configuration file to the printer.
|
[04-80274-EN]