Mobile All-In-One Tool - How to Create Printer Configuration File
Miho
Updated
Problem/Answer
You can create and apply a Printer Configuration File using the app.
This functionality allows users to create and save a new configuration file to configure the printer via Wi-Fi, Bluetooth, or NFC interface. It allows users to easily change the printer configuration from the default setting as shown on the [Create Configuration File] screen and apply the saved file to the selected printer.
The procedure for Creating Printer Configuration File is as follows.
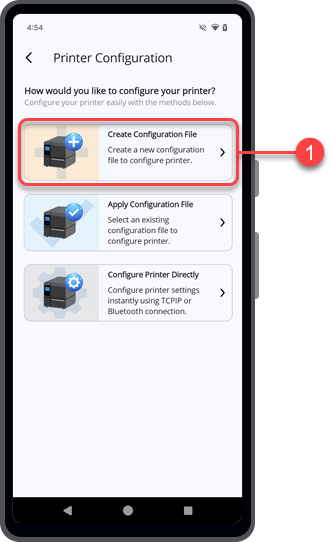
1.
On the[Printer Configuration]screen, tap[Create Configuration File].
The[Select Printer Model]screen appears.
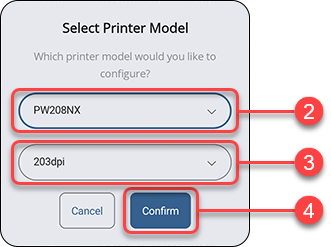
2.
Select the desired printer series from the drop-down lists.
You may do a quick search by entering the initial of the printer model, the most probable printers will show in the drop-down list.
3.
Select the resolution and printing mode (if available) from the drop-down lists.
These selections are only available for some printers.
4.
Tap the[Confirm]button.
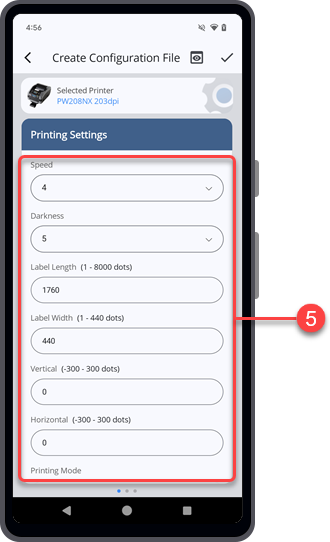
The[Create Configuration File]screen appears and shows the printer configuration with the default settings of the selected printer model.
The menus and settings available on the [Create Configuration File] screen depend on the printer model.
•
Most models include[Printing Settings],[Interface Settings], and[Applications Settings].
•
WT4-AXB series (International Model) printers include only[Printing Settings]and[Interface Settings].
5.
On the[Printing Settings]menu, tap the desired setting items to make any changes.
Swipe the screen upward to view more setting items in the menu.
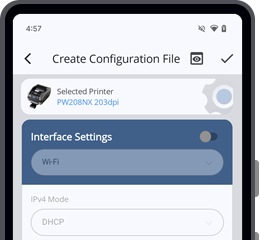
6.
Swipe the screen from right to left to switch to the[Interface Settings]menu.
The [Interface Settings] menu is initially set to disable mode. The setting items are not available.
When the [Interface Settings] menu is disabled, the configuration of the [Interface Settings] menu will not be included in the configuration file.
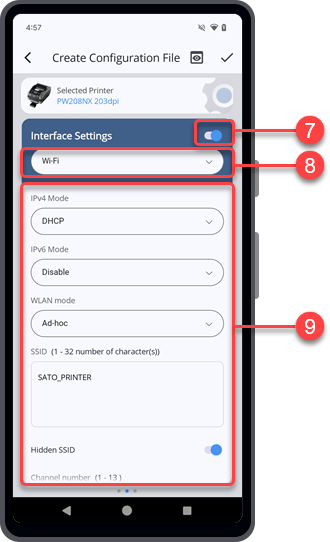
7.
If you want to include and configure the[Interface Settings]menu, tap the toggle switch to set to enable. Otherwise, skip this step and proceed to step 10.
8.
Tap to select the type of interface that you want to configure.
The available interface options differ from the printer series selected.
9.
Tap the desired setting items to make any changes.
After you have finished configuring the [Interface Settings] menu, proceed to the next step.
10.
Swipe the screen from right to left to switch to the[Applications Settings]menu.
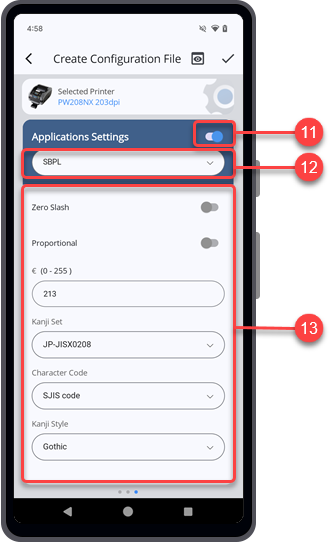
Similar to the [Interface Settings] menu, the [Applications Settings] menu is initially set to disable mode.
11.
If you want to include and configure the[Applications Settings]menu, tap the toggle switch to set to enable. Otherwise, skip this step and proceed to step 14.
12.
Tap to select the type of application that you want to configure.
The available application options differ from the printer series selected.
13.
Tap the desired setting items to make any changes.
After you have finished configuring the [Applications Settings] menu, proceed to the next step.
14.
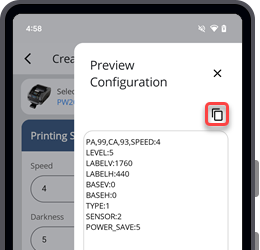
Tapon the upper right corner of the[Create Configuration File]screen to preview the content of the printer configuration file.
The[Preview Configuration]dialog is displayed.
Tapto copy the content to the clipboard.
Tapto close the[Preview Configuration]dialog.
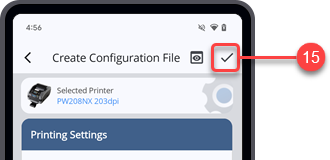
15.
When you have finished configuring the printer settings, tapto proceed saving the configuration file.
16.
When the[File Encryption]dialog is shown, select[Yes]if you want your file save with a password or select[No]if you want to save the file without password encryption.
For iPhone users, please proceed to step 20. File Encryption function is only available for Android device.
•
As there is no option to reset or retrieve a lost password, users are responsible for keeping their passwords safe.
If you selected[Yes], proceed to the next step.
If you selected[No], proceed to step 20.
17.
Enter four characters PIN code that contains only alphanumeric characters and symbols on the field boxes.
Your password can include upper and lower case letters, numbers, and special characters like !,@,#,$,%,^,&,*,-,+,=, or /, but it should not include any spaces.
Tap the
icon located next to the PIN code field to show the password you have typed in.
18.
Re-enter the same pin code in the confirmation field to confirm it.
19.
Tap the[Confirm]button.
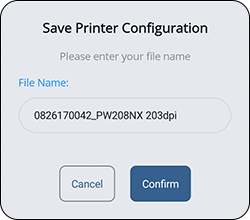
20.
When the[Save Printer Configuration]dialog is shown, enter your preferred file name and tap[Confirm].
•
By default, the printer configuration file is saved in the Internal storage/Download folder of the Android device, or in the application (All-In-One Tool) folder of the iPhone.
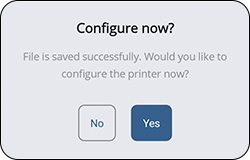
After the file has been successfully saved, the[Configure now?]dialog is shown.
21.
Tap[Yes]if you want to continue to configure the printer with the saved configuration file. Tap[No]to return to the[Create Configuration File]screen.
If you select[Yes], the[Configure Printer]screen is shown.
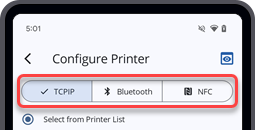
22.
Select the interface and the ways that you want to connect and apply the configuration file to the printer.